No, this is not my last post. It is only the last post of this blog. I continue my blog at this address: passwordquilt.wordpress.com. Be welcome to read on there, and if you have any questions or want to leave a comment, please feel free to do so over there. Thank you!
Category Archives: Uncategorized
Starting a new project
I have started a new big project today, and it has nothing to do with sewing. At least nothing more than hemming the edges of the linen.
It makes me think about new beginnings in general. They can be freeing, and relieving, but painful as well, and at the same time. I think everybody can relate to that. It is part of all our lives, wether we like it or not.
I read a quote by Paul McCartney who turned 72 today which might help to struggle on: The one is brave in this life who doesn’t give up.
The Farmer’s Wife is done
A big quilting project comes to a close: my Farmer’s Wife quilt. Someone asked me the other day how long it took me. I said I didn’t know but I guessed it could be a whole year. Now, I have looked it up in my blog chronicles, and to my surprise I started out on this journey more than two years ago. In March 2012, I posted about the first square, Wrench. Little did I know that it would take me that long to finish it. But that is exactly what happened today.
I finished the quilting a couple of days ago. As mentioned before, I played with the thought of not binding the quilt at all. I have only done this once before, on a very small wall hanging. But this technique has nothing to do with size. It is rather simple, and I will quickly describe it here.
For this method, it is essential that you do not quilt up to the edge, but stop at least half an inch before it.
After all quilting is done, I cut the three layers evenly with a ruler and rotary cutter. Then I took some scissors and trimmed the batting a quarter of an inch so that top and back stand out.
This is the trickiest part of it because I almost cut the backing fabric several times—or thought that I would. It cost me some nerves. In fact, I found this way too exciting and decided to pin the top and back out of the way to be able to cut the batting of the three other sides without obstacles.
Now, on all four sides, the batting is a quarter of an inch shorter than the top and backing fabric. Next, I folded the protruding part of the top and backing inside, enveloping the batting with the backing fabric. I pinned it and then sewed it with an invisible stitch by hand.
.
And I am very pleased with the result of no binding. See a picture of the whole quilt here.
.
Farmer’s wife: Quilting
The quilting on my Farmer’s Wife quilt is done. It was done in no time—or so it seemed to me. As I imagined beforehand, I enjoyed re-visiting each square so much.
So another big projects draws to a close. I quilted the outer border in just two days. Now I am only waiting for my fingers to rejuvenate so that I might finish the quilt with a binding. Or rather, with no binding at all.
I had planned to bind the quilt by folding the backing fabric to the front, but it turned out that there is a small distance at one edge of the quilt where the backing fabric is too short. Now I am thinking about finishing the quilt with no binding. The alternative would be to buy binding fabric. Hard decision …
I also thought about labeling each of the 110 squares by embroidering their names on the sashing strips. I would have liked this a lot. But I didn’t come to a satisfactory solution as to how to do it, floss, and colour, without losing the present look and feel. Besides, I think I should have done any embroidery before making the quilt sandwich, so I put the idea aside. So it seems the finishing date is only a few days away.
Basting without kneeling
My Farmer’s Wife quilt has now two borders, an 1 inch grey polka dot, and a 4 inch white and light blue stripe. Since I moved in my flat in September, this is the first big quilt I wanted to baste. I used to do it on the floor, usually in our dining room which is tiled. I moved the table and chairs to the side and crawled on my knees for one or two hours.
Now, I have a light-coloured laminate floor in all rooms—not fit for scratching needles. So I pondered over an alternative way of basting my quilt and came across this method on Pinterest:
I wrapped the backing fabric and the quilt top around two boards I bought in a hardware store.
Then I began to uncoil them on my dining room table, letting the batting float in between. I smoothed out any wrinkles while going and started pinning. When I was done with the section on the table, I pulled it to the side and let it hang off the table, then unrolling another section of top and back.
I admit that I had some doubts as to the exact direction of the three layers and any wrinkles since I was used to fix the top and the back on the floor with some tension. Moreover, it was somewhat exciting whether the backing and batting would be long enough or one of them would end before I had completely unrolled the top—but of course my measuring was correct and everything went well. I was done in no time—or so it seemed to me. And neither my back nor my knees ached the least bit!
I decided to quilt every one of the 110 squares individually, making the design up as I go. I am looking forward to “re-visiting” them all.
Easter preparations
The internet is a great source of inspiration for me, as is for anyone, of course. Yet, inspiration can be found anywhere. Nature—God’s gift to us—is beautiful and therefore ever inspirational. Especially now, with the short and dark days gone, shrubs bursting with new life, the air gentler than long and smelling like spring, I myself feel like I am waking up from an hibernation.
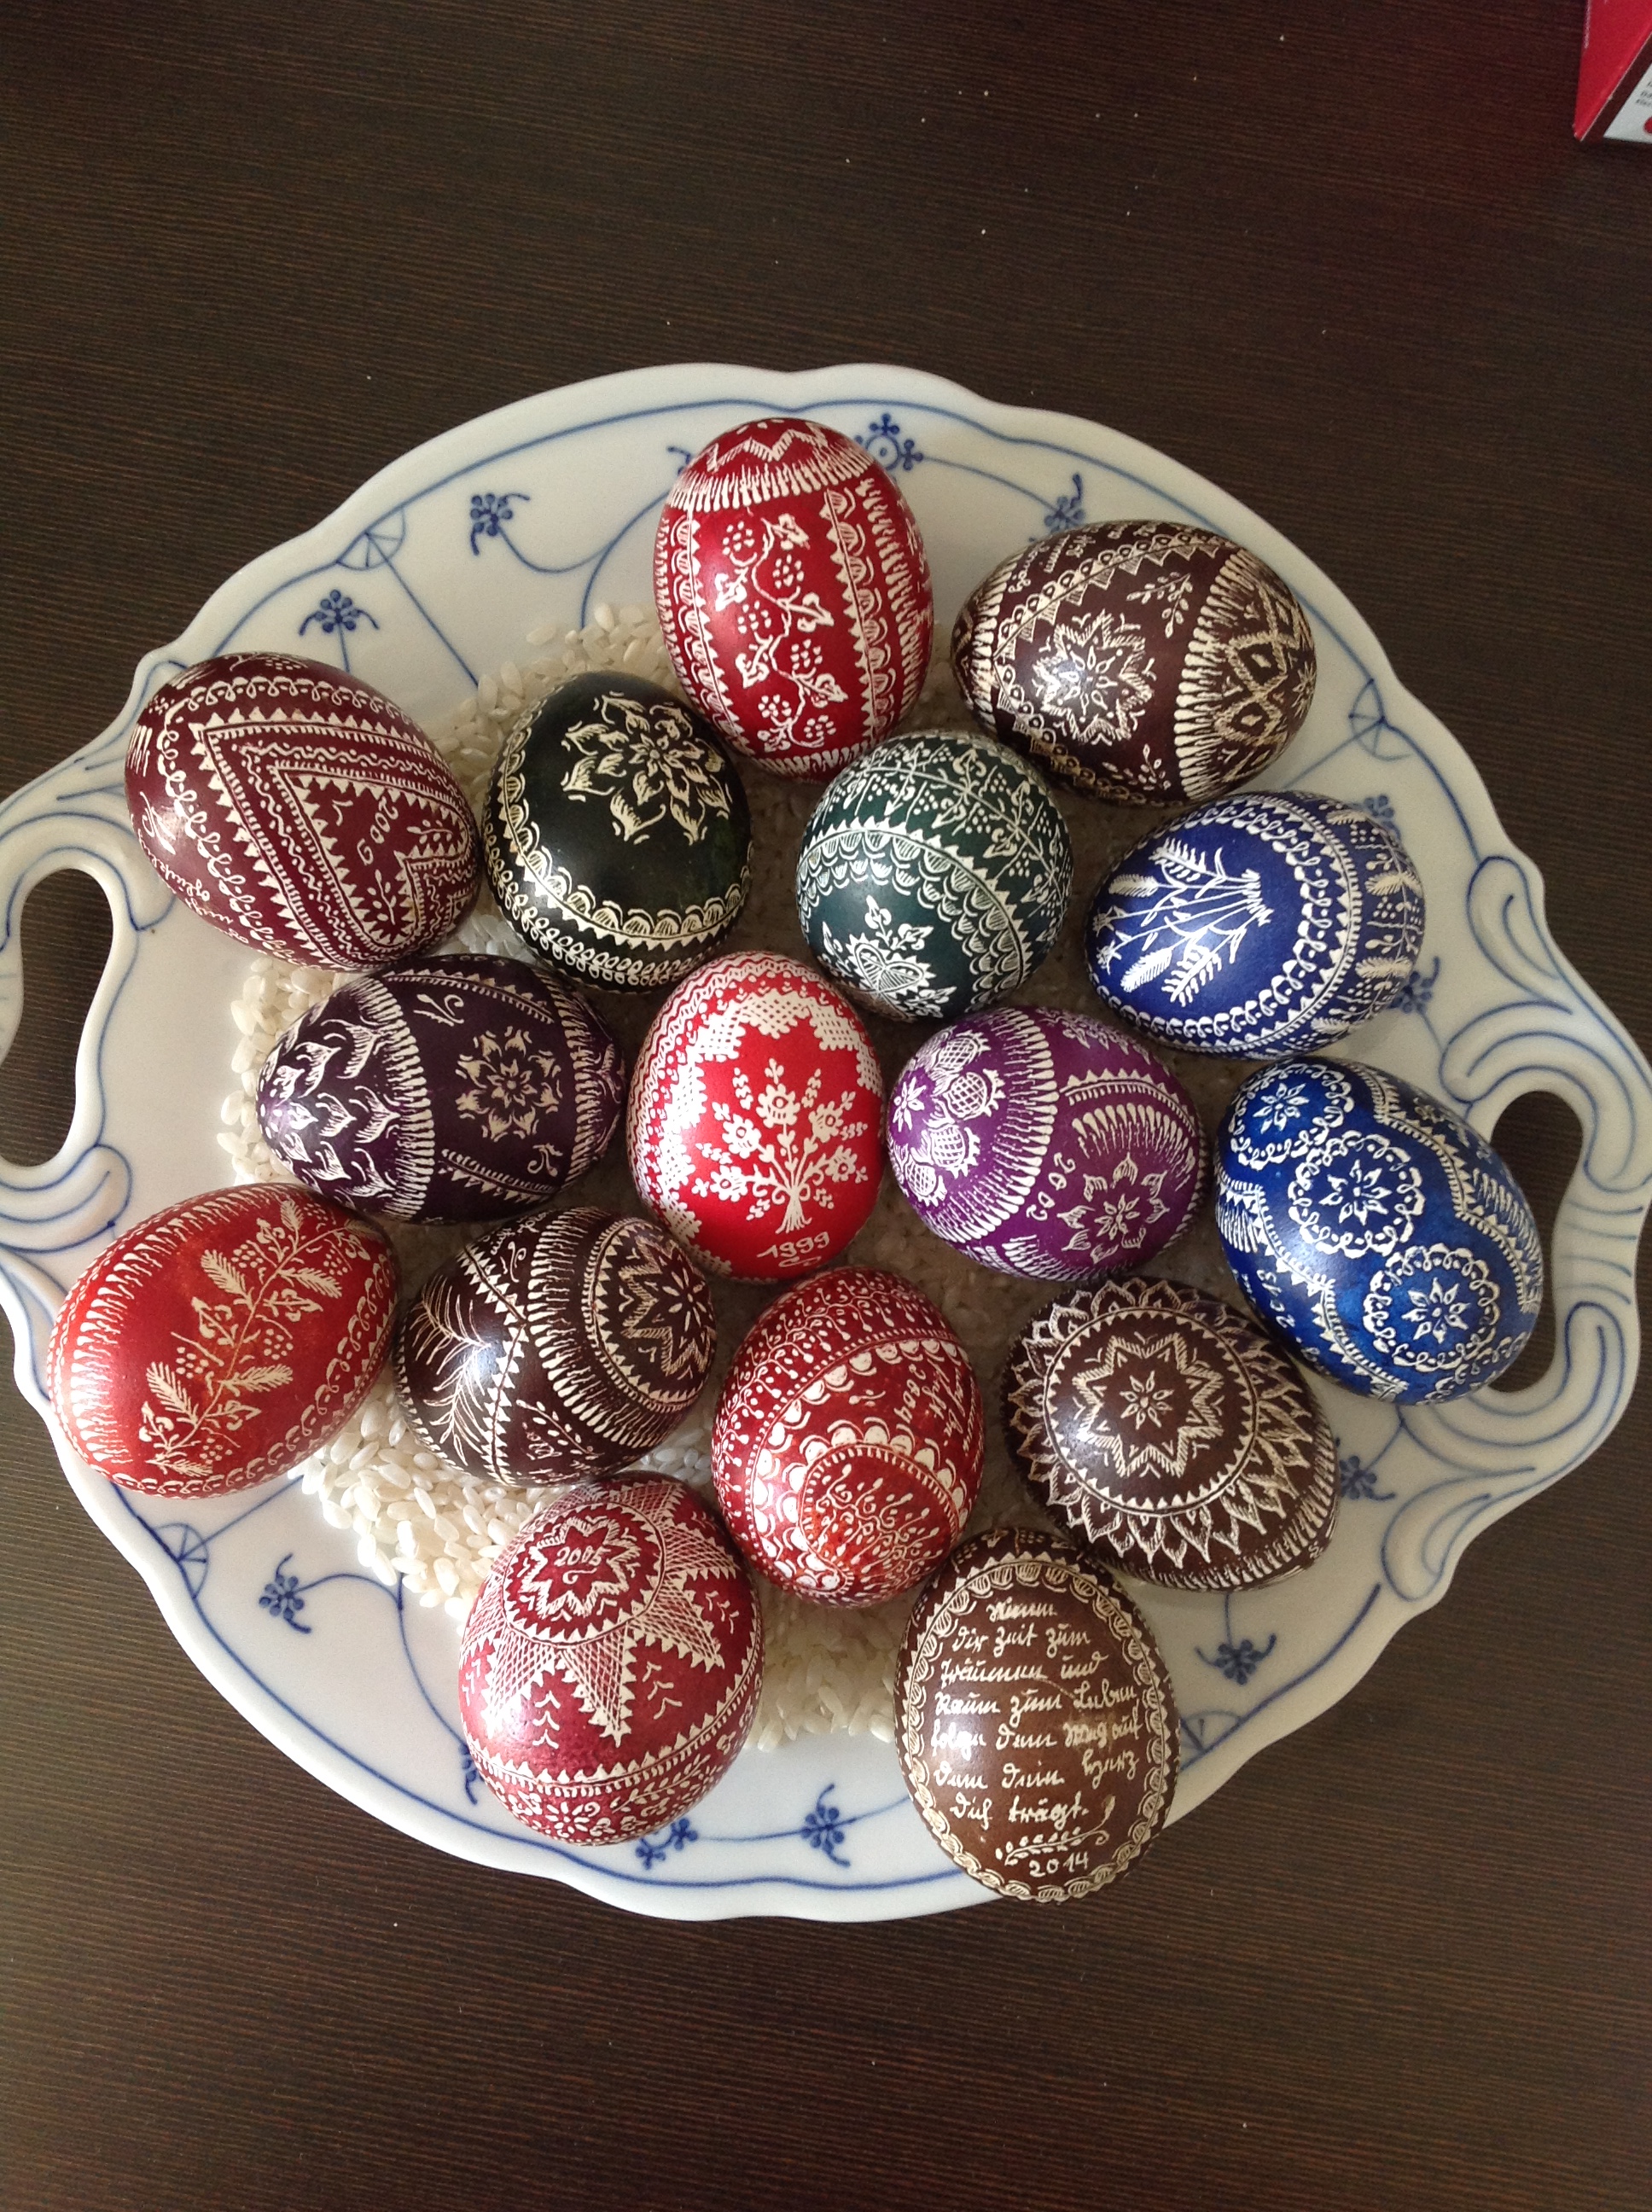
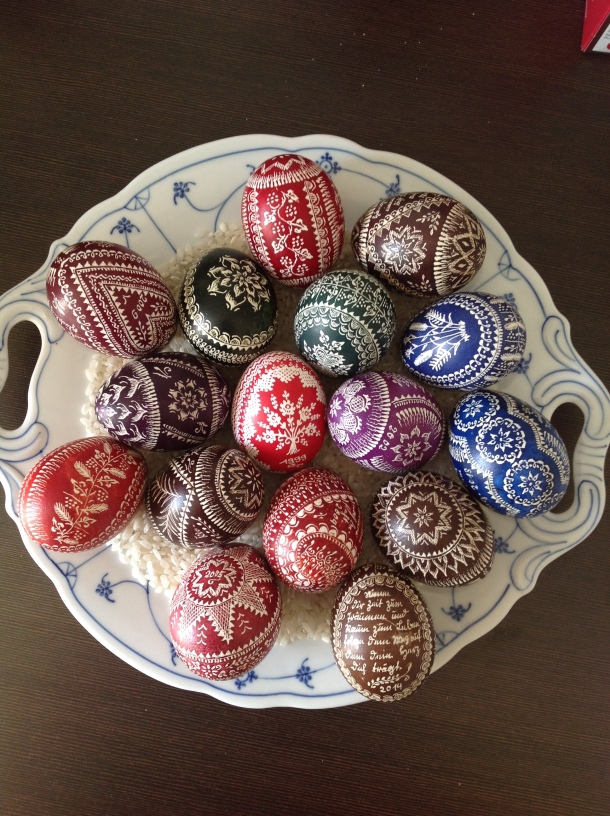
Visiting a local easter market, I found myself inspired to haul out my easter decorations and prepare my flat for the upcoming holidays. Every year, my mom buys me an easter egg, bearing the year date.
To purfle eggs like this has a very long tradition. The ornaments are old, as is the technique. I know of two techniques coming to the same result. One is to dye the egg and then to scrape off the colour again with a very sharp knife. My eggs, however, are done the other way round: the ornaments are brought on in form of melted wax, then dyed in cold colour, and after that, the wax is melted away so that the eggshell is visible where the wax has been.
Every one of my sixteen eggs so far, has a little verse or saying which the 86 year old lady who makes these works of art writes in old German letters. Fortunately, my grandmother taught me to read these characters as a child. But the lovely old lady always reads the inscription out aloud for me when we buy the egg. They are not blown, by the way, but raw and heavy. One would think they would begin to smell but they do not, of course. They dry very, very slowly over the years until they get as light as a blown egg at last.
Lately, I saw a knitted egg cosy on the internet and tried my version of it. What a cute little easter present this will make.
Great Great Britain
I like Great Britain a lot, for many reasons. And since I am always inspired by British themed things, I long wanted to do some Brit blocks. Currently I am waiting to be able to finish my Farmer’s Wife quilt, and so I thought it would be a good idea to use up some scraps and start a not too big quilting project dedicated to the UK. I plan a block when the previous is finished, so no idea where I’ll end up.